- FutureNet製品活用ガイド
- FutureNet NXR,WXRシリーズ
- LANインタフェース編
FutureNet
NXR,WXRシリーズ
LANインタフェース編
2. DHCP設定
2-2. DHCPリレー設定
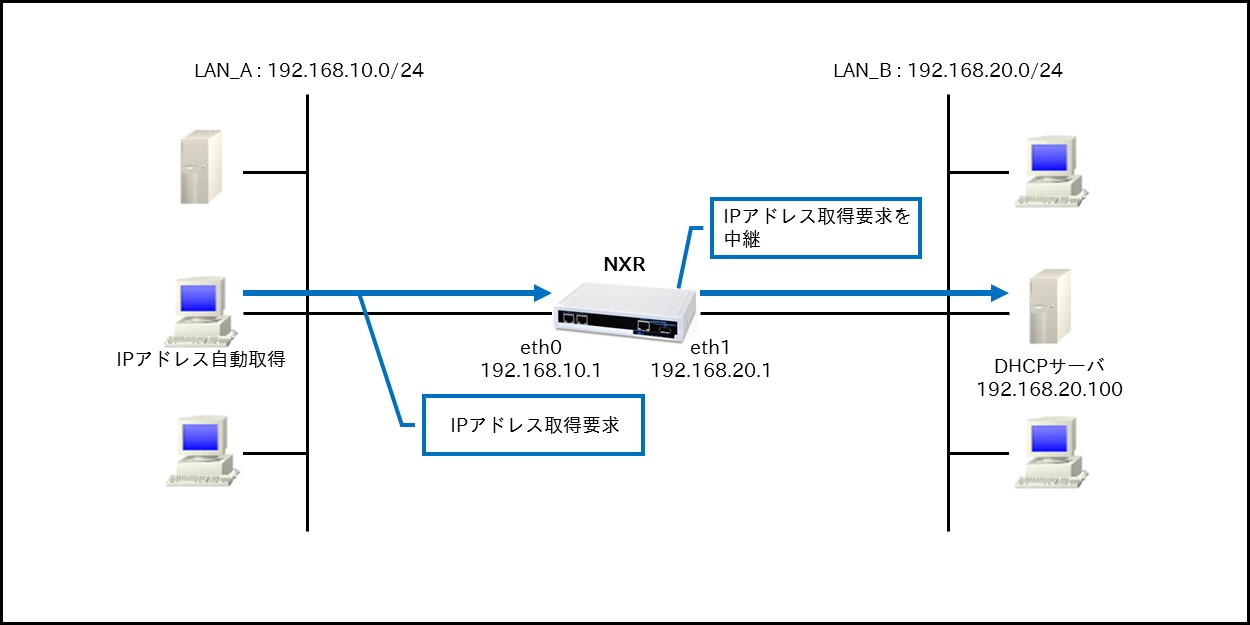
DHCPリレー機能では、異なるネットワークにあるDHCPサーバでIPアドレスを一括管理している場合など、ルータ経由で端末にIPアドレスを払い出す場合に利用します。
【 構成図 】
【 設定データ 】
| 設定項目 | 設定内容 | ||
|---|---|---|---|
| インタフェース | ethernet0のIPアドレス | 192.168.10.1/24 | |
| ethernet1のIPアドレス | 192.168.20.1/24 | ||
| DHCPリレー | DHCPサーバのIPアドレス | 192.168.20.100 | |
【 設定例 】
nxr120#configure terminal
Enter configuration commands, one per line. End with CNTL/Z.
nxr120(config)#interface ethernet 0
nxr120(config-if)#ip address 192.168.10.1/24
nxr120(config-if)#exit
nxr120(config)#interface ethernet 1
nxr120(config-if)#ip address 192.168.20.1/24
nxr120(config-if)#exit
nxr120(config)#dhcp-relay
nxr120(config-dhcpr)#address 192.168.20.100
nxr120(config-dhcpr)#exit
nxr120(config)#exit
nxr120#save config
【 設定例解説 】
1. <ethernet0インタフェース設定>
nxr120(config)#interface ethernet 0
nxr120(config-if)#ip address 192.168.10.1/24
nxr120(config-if)#ip address 192.168.10.1/24
ethernet0インタフェースのIPアドレスを設定します。
2. <ethernet1インタフェース設定>
nxr120(config)#interface ethernet 1
nxr120(config-if)#ip address 192.168.20.1/24
nxr120(config-if)#ip address 192.168.20.1/24
ethernet1インタフェースのIPアドレスを設定します。
3. <DHCPリレー設定>
nxr120(config)#dhcp-relay
nxr120(config-dhcpr)#address 192.168.20.100
nxr120(config-dhcpr)#address 192.168.20.100
中継するDHCPサーバのIPアドレスを設定します。
【 端末の設定例 】
| LAN_Aの端末 | ||
| IP アドレス | DHCPサーバから自動取得 | |
| サブネットマスク | ||
| デフォルトゲートウェイ | ||
| DNSサーバ | ||