- FutureNet製品活用ガイド
- FutureNet NXR,WXRシリーズ
- NAT・フィルタ編
FutureNet
NXR,WXRシリーズ
NAT・フィルタ編
4. Web認証設定
4-3. ユーザ強制認証+URL転送
Web認証機能では通常外部に接続したいユーザは認証URLへのアクセスが必要となりますが、強制認証機能ではTCP80番ポートへの接続を監視し、未認証ユーザからの接続があった場合、強制的にWeb認証を行います。なお、この設定例ではユーザ認証成功後、設定したURLへ転送します。
【 構成図 】
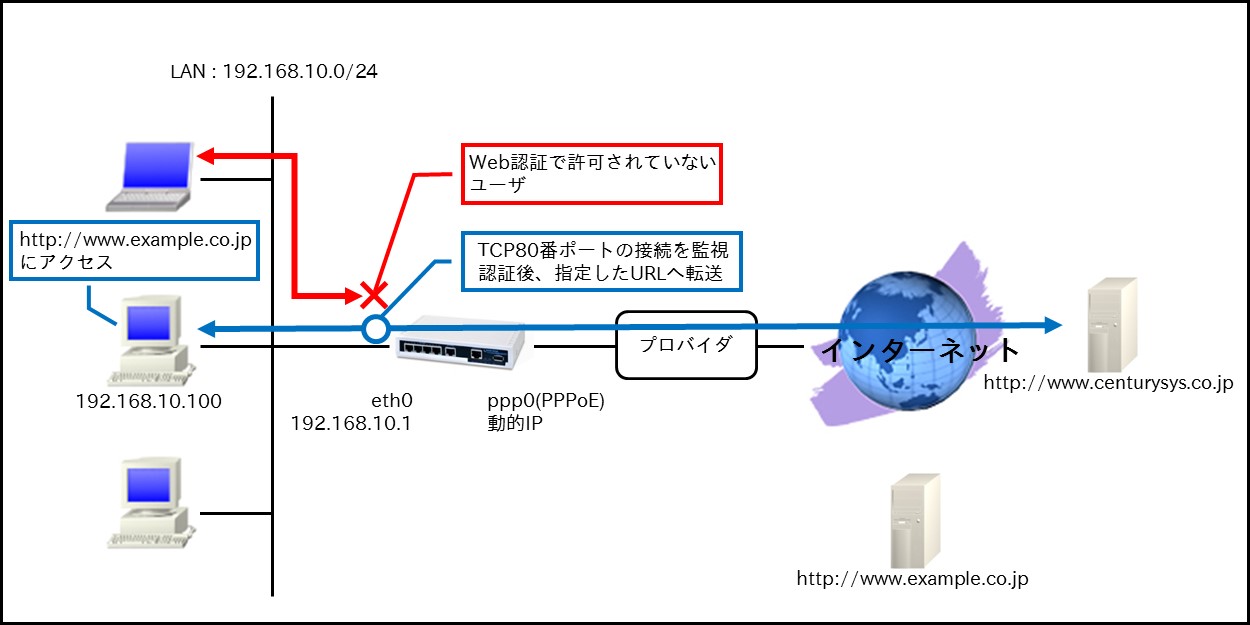
- TCPポート80番への接続を監視し、接続があった際に認証画面をポップアップします。また、ユーザ認証成功後、指定したURLへ転送します。
- 認証後、許可されたユーザとの間で、無通信状態になってから一定時間経過すると通信を遮断するよう設定します。
【 設定データ 】
| 設定項目 | 設定内容 | |||
|---|---|---|---|---|
| LAN側インタフェース | ethernet0のIPアドレス | 192.168.10.1/24 | ||
| WAN側インタフェース | PPPoEクライアント(ethernet1) | ppp0 | ||
| ppp0のIPアドレス | 動的IPアドレス | |||
| IPマスカレード | 有効 | |||
| SPIフィルタ | 有効 | |||
| MSS自動調整 | オート | |||
| IPリダイレクト | 無効 | |||
| ISP接続用ユーザID | test1@example.jp | |||
| ISP接続用パスワード | test1pass | |||
| スタティックルート | 宛先IP アドレス | 0.0.0.0/0 | ||
| ゲートウェイ(インタフェース) | ppp0 | |||
| Web認証 | 認証方式 | HTTP Basic | ||
| 強制認証 | 80番ポート監視(リダイレクト) | |||
| 転送先URL | http://www.centurysys.co.jp | |||
| 接続許可時間(アイドルタイムアウト) | 600秒 | |||
| ログ取得 | 有効 | |||
| ローカル認証用ユーザID | test | |||
| ローカル認証用パスワード | testpass | |||
| LED | AUX1 | ppp0アップ時点灯 | ||
| DNS | サービス | 有効 | ||
| FastFowarding | 有効 | |||
【 設定例 】
Enter configuration commands, one per line. End with CNTL/Z.
nxr120(config)#interface ethernet 0
nxr120(config-if)#ip address 192.168.10.1/24
nxr120(config-if)#exit
nxr120(config)#ip route 0.0.0.0/0 ppp 0
nxr120(config)#interface ppp 0
nxr120(config-ppp)#ip address negotiated
nxr120(config-ppp)#ip masquerade
nxr120(config-ppp)#ip spi-filter
nxr120(config-ppp)#ip tcp adjust-mss auto
nxr120(config-ppp)#no ip redirects
nxr120(config-ppp)#ppp username test1@example.jp password test1pass
nxr120(config-ppp)#exit
nxr120(config)#interface ethernet 1
nxr120(config-if)#no ip address
nxr120(config-if)#pppoe-client ppp 0
nxr120(config-if)#exit
nxr120(config)#system led aux 1 interface ppp 0
nxr120(config)#web-authenticate
nxr120(config-webauth)#authenticate basic
nxr120(config-webauth)#monitor port 80 redirect
nxr120(config-webauth)#redirect-url http://www.centurysys.co.jp
nxr120(config-webauth)#close idle-timeout 600
nxr120(config-webauth)#log enable
nxr120(config-webauth)#account username test password testpass
nxr120(config-webauth)#exit
% restart http-server to apply this setting.
nxr120(config)#exit
nxr120#restart http-server
http-server starting… done
nxr120#configure terminal
Enter configuration commands, one per line. End with CNTL/Z.
nxr120(config)#dns
nxr120(config-dns)#service enable
nxr120(config-dns)#exit
nxr120(config)#fast-forwarding enable
nxr120(config)#exit
nxr120#save config
【 設定例解説 】
1. <LAN側(ethernet0)インタフェース設定>
nxr120(config-if)#ip address 192.168.10.1/24
ethernet0インタフェースのIPアドレスを設定します。
2. <スタティックルート設定>
デフォルトルートを設定します。
3. <WAN側(ppp0)インタフェース設定>
nxr120(config-ppp)#ip address negotiated
ppp0インタフェースのIPアドレスが動的IPアドレスの場合は、negotiatedを設定します。
nxr120(config-ppp)#ip spi-filter
nxr120(config-ppp)#ip tcp adjust-mss auto
nxr120(config-ppp)#no ip redirects
IPマスカレード、ステートフルパケットインスペクションを有効に設定します。また、TCP MSSの調整機能をオート、ICMPリダイレクト機能を無効に設定します。
ISP接続用のユーザIDとパスワードを設定します。
4. <ethernet1インタフェース設定>
nxr120(config-if)#no ip address
nxr120(config-if)#pppoe-client ppp 0
PPPoEクライアントとしてppp0インタフェースを使用できるように設定します。
5. <システムLED設定>
ppp0インタフェースのアップ/ダウンをaux1 LEDで表示するように設定します。
6. <Web認証設定>
nxr120(config-webauth)#authenticate basic
nxr120(config-webauth)#monitor port 80 redirect
Web認証(Basic認証)を行い、ルータ配下の未認証端末からWEBアクセスした際に、Web認証画面をポップアップし、認証後、指定したURLへ転送します。
転送するURLを設定します。
認証で許可されたユーザとの間で、無通信状態になってから600秒経過すると通信を遮断するよう設定します。
ログの取得を有効にします。
ローカル認証用のユーザID、パスワードを設定します。
7. <HTTPサーバ再起動>
Web認証機能を有効にする場合はHTTPサーバを起動する必要があります。デフォルトではHTTPサーバは起動状態になっていますので、ここではHTTPサーバの再起動を行います。
8. <DNS設定>
nxr120(config-dns)#service enable
DNSサービスを有効にします。
9. <ファストフォワーディングの有効化>
ファストフォワーディングを有効にします。ファストフォワーディングを設定することによりパケット転送の高速化を行うことができます。
(☞) ファストフォワーディングの詳細および利用時の制約については、NXR,WXRシリーズのユーザーズガイド(CLI版)に記載されているファストフォワーディングの解説をご参照ください。
【 端末の設定例 】
| IP アドレス | 192.168.10.100 |
| サブネットマスク | 255.255.255.0 |
| デフォルトゲートウェイ | 192.168.10.1 |
| DNS サーバ |